Video Camera - JVC
The JVC Camera is a 2/3" RGB Video camera with Composite output and optional S-video out. Use of S-video requires a different cord from RGB mode.
Setup
The Camera power is connected when attaching the illuminator (PI-3), otherwise with the economy illuminator (PI-4), it is attached to the power supply (a wall transformer) using an inline DC connector socket.
The Camera signal cord has a DB-9 male on the Camera end and a DB-9 male on the Computer end. The cord is not reversible, so the labeling of the connectors must be followed. Use a small (#1) slot screwdriver to attach the cord to the Framegrabber at the rear panel of the computer, and use the thumbscrews to attach the cord to the camera signal connector on the rear panel of the Camera.
For use of the JVC Camera in S-Video mode, a different cable is required (special order), and the D-SUB OUT switch on the side panel is moved from RGB to the Y/C setting.
The Detail switch should be set to On.
The Gamma switch is set to 0.45
The Gain control is normally set to FIX, and +12db.
The Shutter is set to NORM.
The WHITE BALANCE is set to AUTO.
The only adjustment necessary is occasional White-Balance adjustment.
Operation
The Video Camera will power on when the illuminator is powered on.
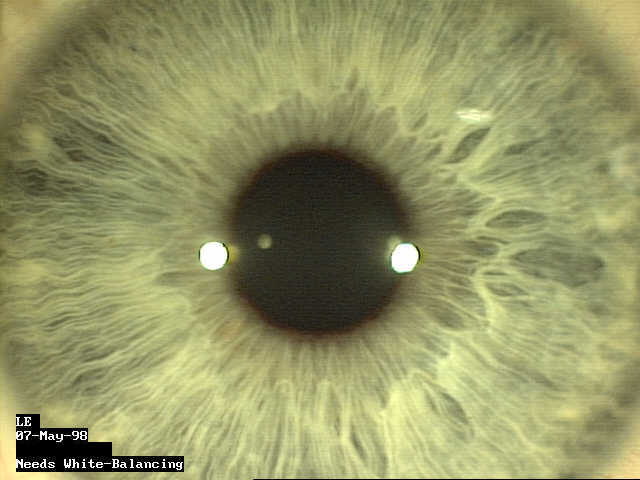
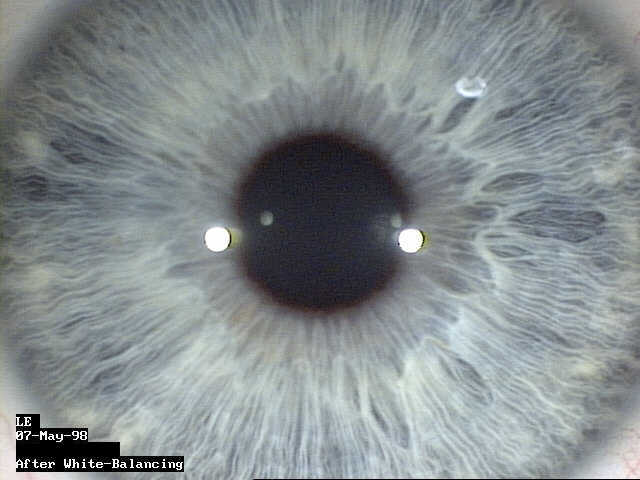
The only adjustment necessary is an occasional white balance adjustment. White balance adjustment is a process where you place a white reference target in front of the camera, set the light level to the normal picture-taking level, and press the button to Set White Balance. The reference target should be as white as you can find. A good choice is the white side of the 720 dpi inkjet paper, or a pure white business card back. When you press the Set button you are telling the camera "this is considered pure white, so set the camera to show it as pure white."
White balance is necessary on initial setup and periodically if the lamp changes its exact color temperature. If the sclera of the eye is showing up as too yellow or too blue, then the White balance may need re-adjustment.
Use the following procedure to set White-Balance
Setting the White Balance
- Power on the Camera and Illumination System
- Start the IrisCamera Program and bring up a live image on the computer screen.
- Set the Illuminator Focusing light brightness to the setting that you normally use for iris photography (default is all the way up).
- Position a very white card or paper in front of the Camera
- Adjust the Camera Aperture so the image of the card or paper is not washed out but bright enough to see the paper grain. This may require stopping it down to an aperture of 16 or so. The image should be as bright as possible without any washout.
- Press the small black SET button on the side of the Camera and hold for one second. The red LED should come on.
When doing Step 6, the image on the monitor should shift in color and the new image is what the camera is considering the reference White.
The White Balance Procedure may need repeating periodically.